 |
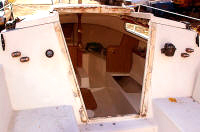
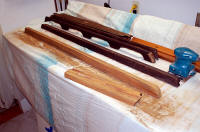
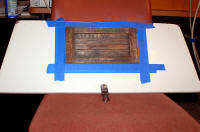
My indoor winter project for this year will be to
refinish all the exterior teak trim on Chip Ahoy: I last did it
over the winter of 2003, right after buying the boat, then called "Take
Five" by a previous owner. Over the five years since, the
trim has aged from an almost golden hue to nearly black in color.
(See a comparison
between 2003 and 2007) The first step
of course is to remove it
all again.
(Nov. 8, 2007) |
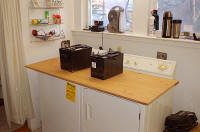 |
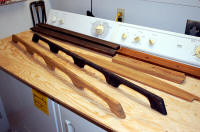
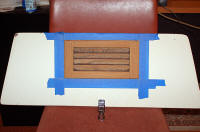
For this project, I cut a piece of
�" plywood to fit over the washer/dryer in the laundry room to use as a
makeshift workbench. Since it wasn't perfectly flat, I soaked it
with water then used the boat's batteries to flatten it to the
appliances' tops. The batteries are stored on the floor nearby on
a charger for the winter. (Nov. 25, 2007) |
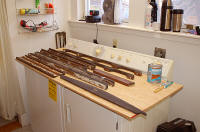 |
The teak trim laid out on the new
"workbench." |
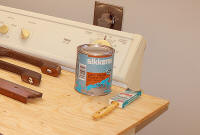 |
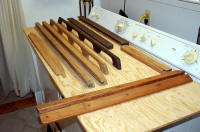
After a lot of sanding to come in the
weeks ahead (and perhaps even
replacement of a
few teak pieces, see below), I plan to put on a number of coats of
Sikkens Cetol Marine Natural Teak. I need to put a few more coats
of varnish (or Cetol) on my
new IdaSailor rudder's
tiller as well. (Nov. 25, 2007)
Trim to potentially replace:
The companionway step
and starboard side hatch rail,
and the much worse port side hatch rail. |
 |
A month back, using Gorilla Glue and
wood clamps, I glued the companionway step back together successfully.
I've salvaged the starboard side hatch rail too. I won't know
for sure about the port side hatch rail until
spring when Chip Ahoy is uncovered and I can determine what
still remains held in
place by the 3M 4200 (or likely 5200 considering how difficult
the rails were to remove). Yesterday I finally got back to the teak refinishing
project, by cleaning out the spare bathtub in the laundry room that I
use just as storage space. The bags of wild bird seed, Chip Ahoy's
porta-potti, five gallon jugs of spring water, and other odds and ends found new
places temporarily so that the tub was available for teak cleaning with StarBrite teak cleaner this morning. (Jan. 21, 2008) |
 |
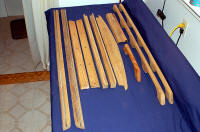
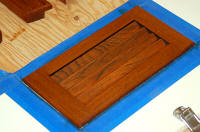
A couple hours of scrubbing the teak
with the cleaner and a 3M Scotchbrite pad didn't produce
much results -- the oiled teak was still a dark brown. Lots of
dirt and old teak oil got scrubbed and rinsed off, but the
teak's appearance didn't change all that noticeably. I considered
using StarBrite's Teak Brightener next, but decided instead to move
directly to sanding. (The photo to the left and the one directly
above are comparisons of after cleaning, then some pieces after
sanding.) |
 |
After all the parts had dried, in mid-afternoon I began
sanding using 60 grit paper and my small hand-sander. By quitting
time this evening I had about half the pieces sanded down and looking
almost like new teak. (See the before-and-after comparisons of
handrails on the left, and companionway hatch slides two photos above.)
Another day and the sanding should be completed; then I can move on to
applying the coats of Cetol. (Jan. 21, 2008) |
 |
All the trim is now sanded with the hand-sander down to
bare teak. (Uh oh, the laundry room, spare bathroom, and
everything in them is coated with a film of teak dust
that'll be impossible to ever completely clean.) The teak sliding
hatch handle is new; I'll add it this spring. Next, one piece at a
time, I'll hand-sand each smoother with 100 grit paper, clean it with a
tack cloth, apply the first coat of Cetol -- then move on to the next
piece. (Jan. 25, 2008) |
 |
The top companionway cribboard's louvered vent still needed to be
sanded by hand. (The cribboard is positioned upside down in this
and the following photo.) I installed the louvered vent in early spring
of 2004, while
refinishing the cribboards, then oiled it like all the other teak trim.
It too needed to be refinished. |
 |
Considering how tedious it was to
carefully and slowly hand-sand between each
louver, the vent too cleaned up nicely. The final piece of teak is ready for
the Cetol finish next. (Jan. 25, 2008)
--
See a close-up
before-and-after comparison of the vent -- |
 |
Yesterday I began applying the Cetol
Marine Natural Teak finish. First I
hand-sanded each piece with 100 grit paper to get a smoother finish than the
machined 60 grit left, dusted it off, then used a tack cloth to remove any
remnant dust particles. With the vent louver (left), I blew it out with
compressed air before using the tack cloth. (Jan. 27, 2008) |
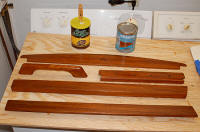 |
I decided to do the Cetol application in two lots due to
space considerations, starting with the exterior companionway trim. I'll apply the second coat today, and
hand-sand the remaining pieces. After the third coat on these
pieces tomorrow, I'll start on the remaining handrails, sliding hatch
rails, and cabin interior companionway trim. So far, I'm very
satisfied with the outcome after applying just a single coat of Cetol. |
|
NEXT | Page
3 | Page 4
| Page 5 |
| Moving on
with Season 2008 improvements |
|
It's never-ending ...
but Sailing Season '08 is ahead and coming! |


