
|
For my planned month's cruise up the
coast of Maine in August, I decided a solar panel was needed to keep the
battery charged between occasional transient slip rentals when I can
hook up to shore power (and grab a shower and a real meal). Without a
stern pulpit yet, finding a place to mount it was a problem that limited
the size of the panel. I ended up with a Uni-Solar US-5 (watt) that'll
provide .3 Amps -- not much but better than nothing and it's supposed to
keep the battery up (we'll see). I'll mount it between the pop-top and
the mast step. |

|
When it arrived, I found the apparent way
to mount it is by inserting screws through slots in the channels,
one slot top and bottom. I'll mount it on a teak frame attached to
the panel, then run four screws up to the frame through the deck from inside the cabin
overhead. |

|
I again measured the space I had to
work with, and took as good an image of the deck curve as possible. |

|
Along with a few photos like above
(and some closer shots), I sketched
out a diagram of the dimensions. The small teak frame rails project went to the
boatyard carpenters to cut. (Apr. 21, 2004) |
|
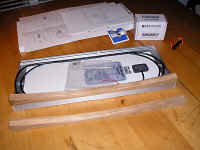
The teak frame rails came back a perfect
fit! Also required is either a blocking diode or a controller. I picked
up a Morningstar Sunguard-4 solar controller, the necessary in-line
fuse, a deck connector through which the electrical wiring cable will run, and the
fastening hardware. (Apr. 24, 2004) |

|
First I sanded and oiled the teak frame rails.
Instead of the apparent method of attaching by using the slots and
channels on the solar panel, I drilled the channel and fastened the rails with stainless steel self-tapping sheet metal screws through countersunk
holes into
the solar panel channel. It's now ready to mount on the
deck. (Apr. 28, 2004) |
|
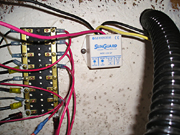
After bringing the battery aboard, I
began the installation by mounting the controller beneath the aft
dinette seat on the aft bulkhead going to the port cockpit bilge, then
did the wiring up to where the panel's cable would enter the overhead. |

|
Next, I drilled for deck holes to fasten four #8X1 1/2" up through
the overhead and into the teak rails, one at each end. Finally, I
drilled a hole for the power cable and ran it through a watertight deck
fitting and into the cabin, then applied 3M 4200 sealer to the holes. I
laid the panel over the holes and went below ... |

|
From below, I fastened the four screws
with finish washers up through the overhead and into the teak rails,
finished up the final wiring connection, ran the panel wiring cable
along the mast lights cable route across the overhead and down the port
side behind the V-berth bulkhead then beneath the cabin aft to the
electrical connections. (May 1, 2004) |

|
The solar panel project
completed: moving on with the
deck organizers and all lines
led aft project next.
(May 2, 2004) |
| Moving on
with Season 2004 improvements |
| It's
never-ending ... but spring is in the air at last, the projects have
begun! |


